错误处理和数据验证
https://wanago.io/2020/06/01/api-nestjs-error-handling-validation/
在处理错误和验证数据方面, NestJS 非常出色。
这在很大程度上要归功于使用装饰器。
在本文中,我们将介绍 NestJS 提供的特性,例如异常过滤器和验证管道。
本系列的代码生成了这个存储库。
它的目标是成为官方 Nest 框架 TypeScript 入门版的扩展版本。
异常过滤器
Nest 有一个异常过滤器,负责处理应用程序中的错误。
每当我们自己不处理异常时,异常过滤器就会替我们处理。
它处理异常并以用户友好的格式将其发送到响应中。
默认的异常过滤器名为 BaseExceptionFilter 。
我们可以查看 NestJS 的源代码并检查它的行为。
nest/packages/core/exceptions/base-exception-filter.ts
export class BaseExceptionFilter<T = any> implements ExceptionFilter<T> {
  // ...
  catch(exception: T, host: ArgumentsHost) {
    // ...
    if (!(exception instanceof HttpException)) {
      return this.handleUnknownError(exception, host, applicationRef);
    }
    const res = exception.getResponse();
    const message = isObject(res)
      ? res
      : {
          statusCode: exception.getStatus(),
          message: res,
        };
    // ...
  }

  public handleUnknownError(exception: T, host: ArgumentsHost, applicationRef: AbstractHttpAdapter | HttpServer) {
    const body = {
      statusCode: HttpStatus.INTERNAL_SERVER_ERROR,
      message: MESSAGES.UNKNOWN_EXCEPTION_MESSAGE,
    };
    // ...
  }
}
每当应用程序中出现错误时, catch 方法就会运行。
我们可以从上述代码中获得一些基本信息。
HttpException
Nest 希望我们使用 HttpException 类。
如果我们不这样做,它将错误解释为无意的,并以 500 内部服务器错误响应。
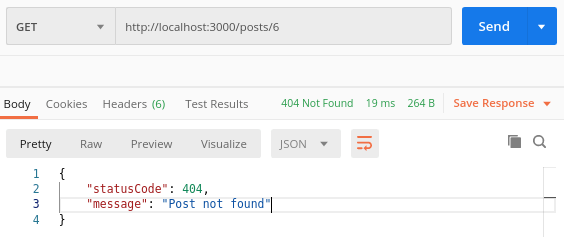
在本系列的前几部分中,我们已经多次使用了 HttpException:
抛出新的 HttpException('Post not found', HttpStatus.NOT_FOUND);
构造函数接受两个必需的参数:响应体和状态代码。
对于后者,我们可以使用提供的 HttpStatus enum。
如果我们提供一个字符串作为响应的定义,NestJS 将其序列化为一个包含两个属性的对象:
- statusCode:包含我们选择的 HTTP 代码
- message:我们提供的描述

我们可以通过提供一个对象作为
HttpException构造函数的第一个参数来重写上述行为。
我们经常发现自己不止一次地抛出类似的异常。
为了避免代码重复,我们可以创建自定义异常。
为此,我们需要扩展 HttpException 类。
posts/exception/postNotFund.exception.ts
import { HttpException, HttpStatus } from "@nestjs/common";

class PostNotFoundException extends HttpException {
  constructor(postId: number) {
    super(`Post with id ${postId} not found`, HttpStatus.NOT_FOUND);
  }
}
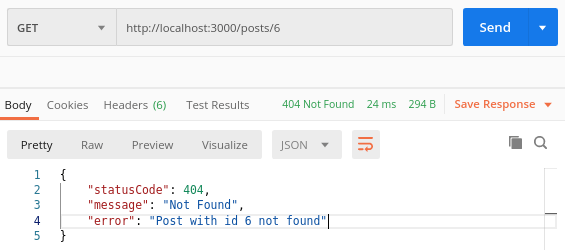
我们的自定义 PostNotFoundException 调用 HttpException 的构造函数。
因此,我们可以通过不必在每次想要抛出错误时都定义消息来清理代码。
NestJS 有一组扩展 HttpException 的异常。
其中一个是 NotFoundException。
我们可以重构上面的代码并使用它。
我们可以在文档中找到完整的内置
HTTP异常列表。
posts/exception/postNotFund.exception.ts
import { NotFoundException } from "@nestjs/common";

class PostNotFoundException extends NotFoundException {
  constructor(postId: number) {
    super(`Post with id ${postId} not found`);
  }
}
NotFoundException 类的第一个参数是一个附加的错误属性。
这样,我们的消息就由 NotFoundException 定义,并且是基于状态的。

扩展 BaseExceptionFilter
默认的 BaseExceptionFilter 可以处理大多数常规情况。
然而,我们可能想要以某种方式修改它。
最简单的方法是创建一个扩展它的过滤器。
utils/exceptionsLogger.filter.ts
import { Catch, ArgumentsHost } from "@nestjs/common";
import { BaseExceptionFilter } from "@nestjs/core";

@Catch()
export class ExceptionsLoggerFilter extends BaseExceptionFilter {
  catch(exception: unknown, host: ArgumentsHost) {
    console.log("Exception thrown", exception);
    super.catch(exception, host);
  }
}
@Catch()装饰器意味着我们希望过滤器捕获所有异常。
我们可以向它提供一个异常类型或一个列表。
ArgumentsHost 使我们无法访问应用程序的执行上下文。
我们将在本系列的后续部分对此进行探讨。
我们可以以三种方式使用我们的新过滤器。
第一个是通过 app.useGlobalFilters 在所有路由中全局使用它。
main.ts
import { HttpAdapterHost, NestFactory } from "@nestjs/core";
import { AppModule } from "./app.module";
import * as cookieParser from "cookie-parser";
import { ExceptionsLoggerFilter } from "./utils/exceptionsLogger.filter";

async function bootstrap() {
  const app = await NestFactory.create(AppModule);

  const { httpAdapter } = app.get(HttpAdapterHost);
  app.useGlobalFilters(new ExceptionsLoggerFilter(httpAdapter));

  app.use(cookieParser());
  await app.listen(3000);
}
bootstrap();
更好的全局注入过滤器的方法是将它添加到 AppModule 中。
因此,我们可以向过滤器中注入额外的依赖项。
import { Module } from "@nestjs/common";
import { ExceptionsLoggerFilter } from "./utils/exceptionsLogger.filter";
import { APP_FILTER } from "@nestjs/core";

@Module({
  // ...
  providers: [
    {
      provide: APP_FILTER,
      useClass: ExceptionsLoggerFilter,
    },
  ],
})
export class AppModule {}
绑定过滤器的第三种方法是附加 @UseFilters 装饰器。
我们可以为它提供单个过滤器,或多个过滤器。
@Get(':id')
@UseFilters(ExceptionsLoggerFilter)
getPostById(@Param('id') id: string) {
  return this.postsService.getPostById(Number(id));
}
上面的方法并不是记录异常的最佳方法。
NestJS 有一个内置的 Logger ,我们将在本系列接下来的部分中介绍它。
实现 ExceptionFilter 接口
如果我们需要一个完全定制的错误行为,我们可以从头构建过滤器。
它需要实现 ExceptionFilter 接口。
让我们来看一个例子:
import { ExceptionFilter, Catch, ArgumentsHost, NotFoundException } from "@nestjs/common";
import { Request, Response } from "express";

@Catch(NotFoundException)
export class HttpExceptionFilter implements ExceptionFilter {
  catch(exception: NotFoundException, host: ArgumentsHost) {
    const context = host.switchToHttp();
    const response = context.getResponse<Response>();
    const request = context.getRequest<Request>();
    const status = exception.getStatus();
    const message = exception.getMessage();

    response.status(status).json({
      message,
      statusCode: status,
      time: new Date().toISOString(),
    });
  }
}
上面有一些值得注意的事情。
因为我们使用了@Catch(NotFoundException),所以这个过滤器只对 NotFoundException 运行。
host.switchToHttp 方法返回带有 HTTP 上下文信息的 HttpArgumentsHost 对象。
在本系列的后续部分中,当讨论执行上下文时,我们将对它进行大量探讨。
验证
我们肯定应该验证即将到来的数据。
在 TypeScript Express 系列中,我们使用了类验证器库。
NestJS 也合并了它。
NestJS 附带了一组内置管道。
管道通常用于转换输入数据或验证数据。
今天我们只使用预定义的管道,但在本系列的后续部分中,我们可能会研究如何创建自定义管道。
要开始验证数据,我们需要 ValidationPipe。
main.ts
import { NestFactory } from "@nestjs/core";
import { AppModule } from "./app.module";
import * as cookieParser from "cookie-parser";
import { ValidationPipe } from "@nestjs/common";

async function bootstrap() {
  const app = await NestFactory.create(AppModule);
  app.useGlobalPipes(new ValidationPipe());
  app.use(cookieParser());
  await app.listen(3000);
}
bootstrap();
在本系列的第一部分中,我们已经创建了数据传输对象。 它们定义在请求中发送的数据的格式。 它们是附加验证的完美地方。
NPM 安装类验证器类转换器
为了让 ValidationPipe 工作,我们还需要类转换器库
auth/dto/register.dto.ts
import { IsEmail, IsString, IsNotEmpty, MinLength } from "class-validator";

export class RegisterDto {
  @IsEmail()
  email: string;

  @IsString()
  @IsNotEmpty()
  name: string;

  @IsString()
  @IsNotEmpty()
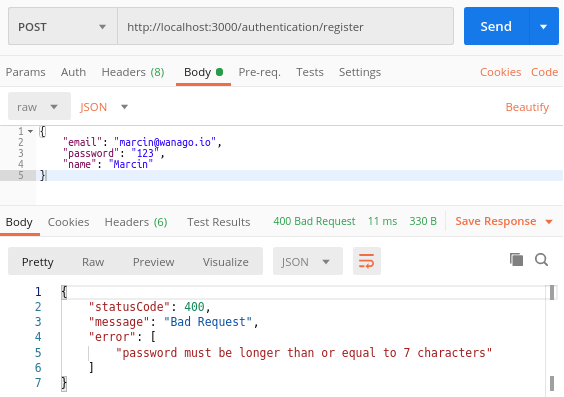
  @MinLength(7)
  password: string;
}

export default RegisterDto;
由于我们使用了上面的 RegisterDto 和@Body()装饰器, ValidationPipe 现在检查数据。
@Post('register')
async register(@Body() registrationData: RegisterDto) {
  return this.authenticationService.register(registrationData);
}

我们可以使用的装饰器还有很多。 要获得完整列表,请查看类验证器文档。 您还可以创建自定义验证装饰器。
验证参数
我们也可以使用类验证器库来验证参数。
utils/findOneParams.ts
import { IsNumberString } from 'class-validator';

class FindOneParams {
  @IsNumberString()
  id: string;
}
@Get(':id')
getPostById(@Param() { id }: FindOneParams) {
  return this.postsService.getPostById(Number(id));
}
请注意我们在这里不再使用@Param('id')。
相反,我们分解整个 params 对象。
如果你使用 MongoDB 而不是 Postgres, @IsMongoId()装饰器可能会对你有用
处理 Patch
在 TypeScript Express 系列中,我们讨论了 PUT 和 PATCH 方法的区别。 总而言之,PUT 替换实体,而 PATCH 应用部分修改。 在执行部分更改时,我们需要跳过缺失的属性。
处理 PATCH 最直接的方法是将 skipMissingProperties 传递给我们的 ValidationPipe。
不幸的是,这将跳过我们所有 dto 中缺少的属性。
我们在发布数据时不想这样做。
相反,我们可以在更新数据时向所有属性添加 IsOptional 。
import { IsString, IsNotEmpty, IsNumber, IsOptional } from "class-validator";

export class UpdatePostDto {
  @IsNumber()
  @IsOptional()
  id: number;

  @IsString()
  @IsNotEmpty()
  @IsOptional()
  content: string;

  @IsString()
  @IsNotEmpty()
  @IsOptional()
  title: string;
}
不幸的是,上面的解决方案不是很干净。
这里提供了一些解决方案来覆盖 ValidationPipe 的默认行为。
在本系列的后续部分中,我们将研究如何实现 PUT 而不是 PATCH
总结
在本文中,我们研究了错误处理和验证在 NestJS 中是如何工作的。
由于了解了默认 BaseExceptionFilter 在底层是如何工作的,我们现在知道了如何正确地处理各种异常。
我们也知道如果有这样的需要,如何改变默认行为。
我们还学习了如何使用 ValidationPipe 和类验证器库来验证传入的数据。
在 NestJS 框架中还有很多内容需要涉及,所以请继续关注!